前言
之所以标题为学习,是因为我不会。
这篇文章仅为看完各位佬的wp之后,照葫芦画瓢跟着做一遍的过程,部分脚本会直接使用各位佬的wp。
在这次CTF中,我发现我其实并没有系统地学习逆向,从头到尾都是瞎子乱撞,对于各式各样的知识的理解只是流于表面。
所以啊,还得学,而且还得扎得深点啊。
各位✌的writeup:
👉2023 AntCTF x D^3CTF 亚军 Writeup By S1uM4in)
👉2023 D^3CTF writeup by 万年三等奖
👉还有个官方的wp,就不放了
d3syscall
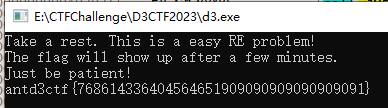
首先看main,大概逻辑就是输入flag,检测。
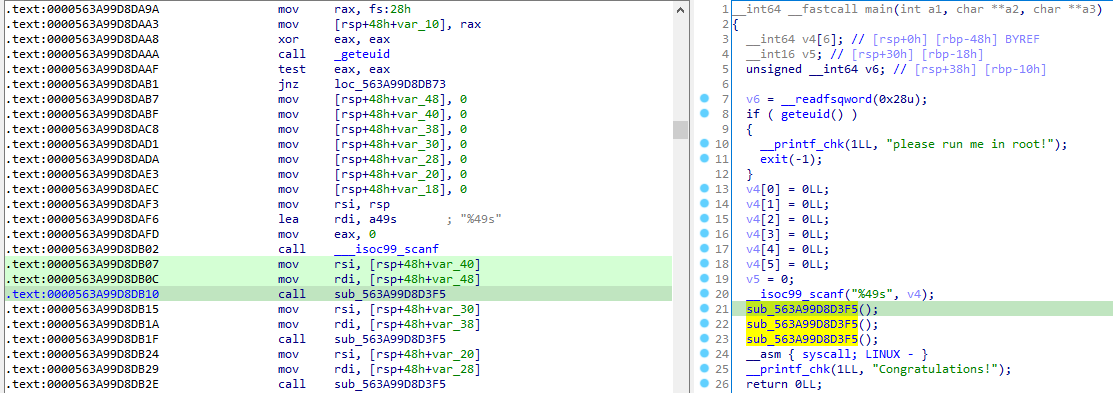
sub_D3F5就是检测函数。
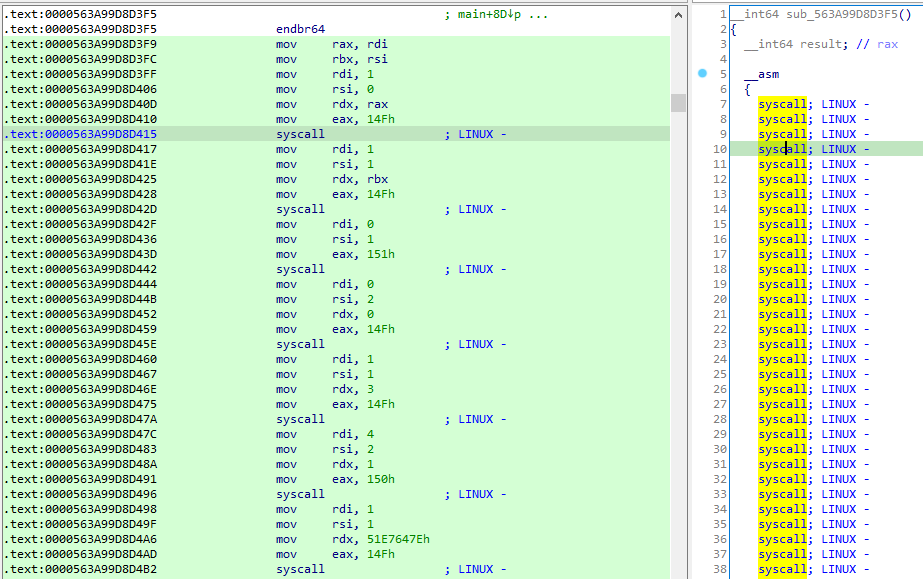
是syscall进行的系统调用,调用的操作由eax的值决定。
因此需要看syscall的调用有什么。
来到sub_1830,这里有对数据段取非,并写文件的操作,还有对字符串异或的操作。
但其实我并不知道为什么程序会来到这里,还是需要系统地学习一下程序执行的流程等知识啊。
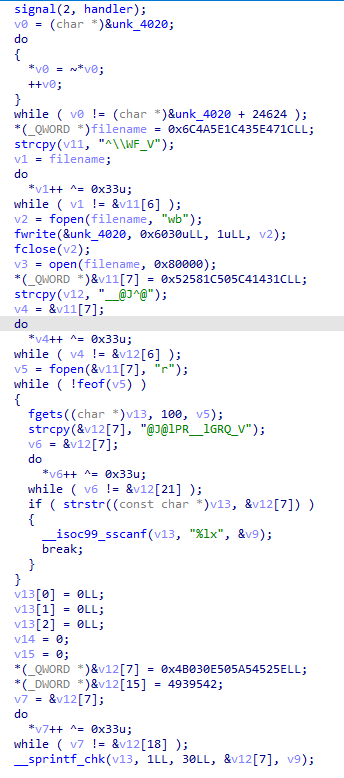
对unk_4020数据段的取非操作,可以在动态调试下直接把结果dump出来,看文件头可以知道是一个新的ELF文件。
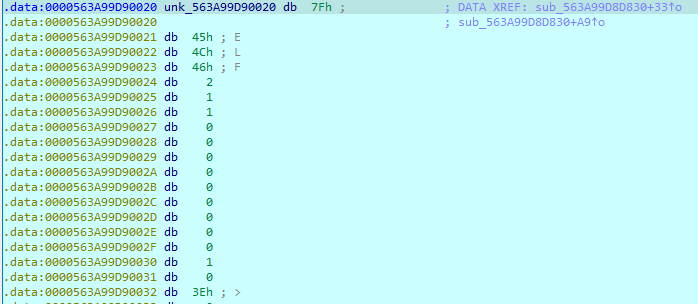
也可以使用生成的文件,路径为/tmp/my_module。
在dump文件的init_module函数中,猜测就是更改系统调用表的过程。
v4的下表对应检测函数每一个syscall的eax取值。
程序首先从/proc/kallsyms中获取了系统调用表的地址,通过参数传递到内核模块中,内核模块里注册了Linux保留的系统调用,分别为:335:MOV,336:ALU,337:PUSH,338:POP,339:resetreg,340:checkflag。

一共更改了五个系统调用。
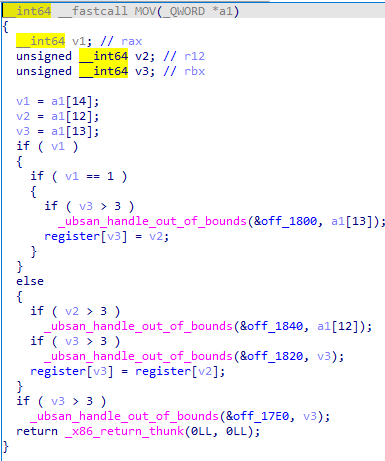
MOV调用:
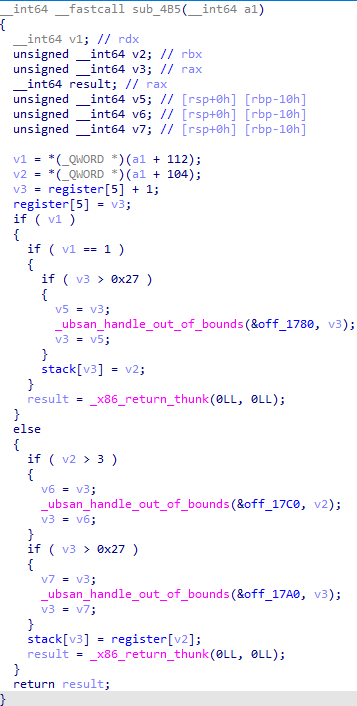
PUSH调用:
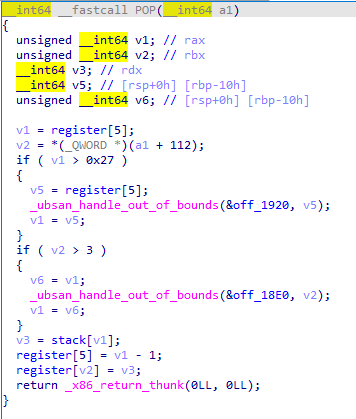
POP调用:
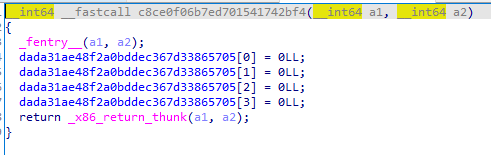
resetreg调用:
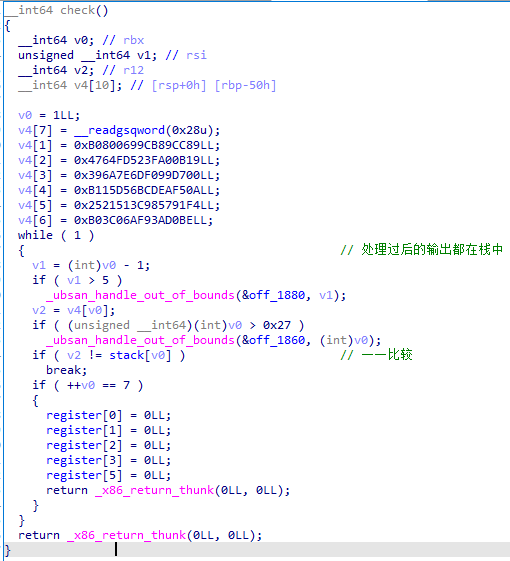
checkflag调用:
将v4与处理过后的输入作比较,进行检测。
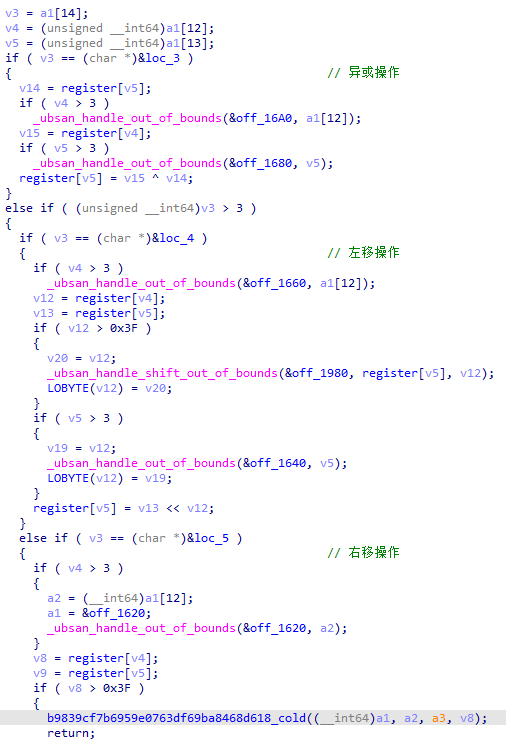
运算操作:
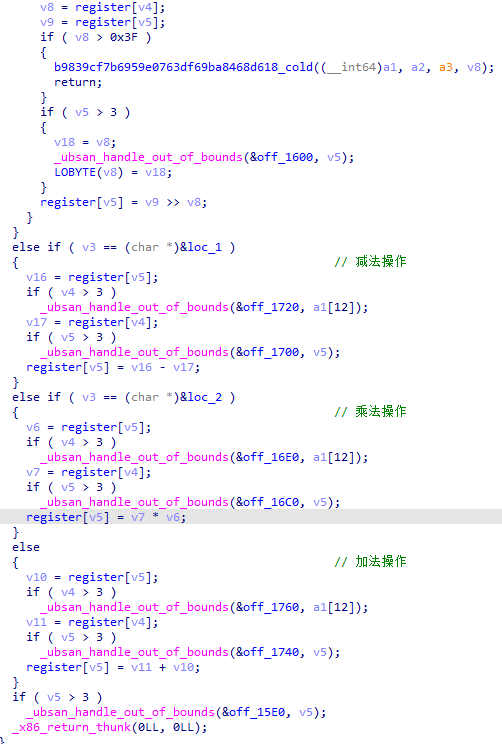
知道了调用,现在只需要知道调用的流程就可以了。
wp里给出了一个十分方便的方法:使用strace。(但其实根据汇编来看也行,但很麻烦)

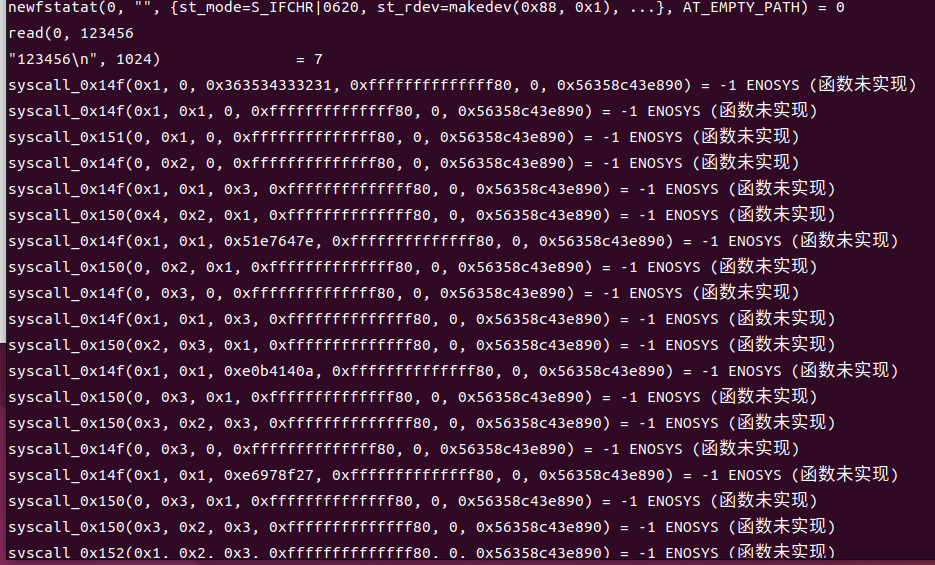
将结果部分进行修改,再代入wp中的脚本中可以清楚地看到检测的逻辑:
1
2
3
4
5
6
7
8
9
10
11
12
13
14
15
16
17
18
19
20
21
22
23
24
25
26
27
28
29
30
31
32
33
34
35
36
37
38
39
40
41
42
43
44
45
46
47
48
49
50
51
52
53
54
55
56
57
58
| bytecode = [
[0x14f, 0x1, 0, 0x3837363534333231, 0, 0x5564c32f4027, 0x7fd40816fa80],
[0x14f, 0x1, 0x1, 0x6665646362613039, 0, 0x5564c32f4027, 0x7fd40816fa80],
[0x151, 0, 0x1, 0x6665646362613039, 0, 0x5564c32f4027, 0x7fd40816fa80],
...
]
def mov(code):
match code[1]:
case 0:
print(f"mov reg[{code[2]}],reg[{code[3]}]")
case 1:
print(f"mov reg[{code[2]}],{hex(code[3])}")
def alu(code):
match code[1]:
case 0:
print(f"add reg[{code[2]}],reg[{code[3]}]")
case 1:
print(f"sub reg[{code[2]}],reg[{code[3]}]")
case 2:
print(f"mul reg[{code[2]}],reg[{code[3]}]")
case 3:
print(f"xor reg[{code[2]}],reg[{code[3]}]")
case 4:
print(f"shl reg[{code[2]}],reg[{code[3]}]")
case 5:
print(f"shr reg[{code[2]}],reg[{code[3]}]")
def push(code):
match code[1]:
case 0:
print(f"push reg[{code[2]}]")
case 1:
print(f"push {hex(code[2])}")
def pop(code):
print(f"pop reg[{code[1]}]")
for i in bytecode:
match i[0]:
case 335:
mov(i)
case 336:
alu(i)
case 337:
push(i)
case 338:
pop(i)
case 339:
print("resetreg")
case 340:
print("checkflag")
|
在对逻辑的代码重新整理得到:
1
2
3
4
5
6
7
8
9
10
11
12
13
14
15
16
17
18
19
20
21
22
23
24
25
26
27
28
29
30
31
32
33
34
35
36
37
38
39
40
41
42
43
44
45
46
47
48
49
50
51
52
53
54
55
56
57
58
| input = [32bit] * 6
stack = []
r0 = input[0]
r1 = input[1]
stack.append(r1)
r2 = r0 << 3 + 0x51e7647e
r3 = r0 * 3 + 0xe0b4140a
r2 = r2 ^ r3
r2 ^= (r0 + 0xe6978f27)
stack.pop()
r1 = r1 + r2
stack.append(r1)
stack.append(r0)
r2 = r1 << 6 + 0x53a35337
r3 = r1 * 5 + 0x9840294d
r2 = r2 ^ r3
r3 = r1 - 0x5eae4751
r2 = r2 ^ r3
stack.pop(r0)
stack.append(r0 + r2)
r0 = input[2]
r1 = input[3]
stack.append(0)
r2 = r0 << 3 + 0x51e7647e
r3 = r0 * 3 + 0xe0b4140a
r2 = r2 ^ r3
r2 ^= (r0 + 0xe6978f27)
stack.pop(r1)
r1 += r2
stack.append(r1)
stack.append(r0)
r2 = r1 << 6 + 0x53a35337
r3 = r1 * 5 + 0x9840294d
r2 = r2 ^ r3
r2 ^= r1 - 0x5eae4751
stack.pop(r0)
r0 += r2
stack.append(r0)
r0 = input[4]
r1 = input[5]
stack.append(r1)
r2 = r0 << 3 + 0x51e7647e
r3 = r0 * 3 + 0xe0b4140a
r2 = r2 ^ r3
r2 ^= r0 + 0xe6978f27
stack.pop(r1)
r1 += r2
stack.append(r1)
stack.append(r0)
r2 = r1 << 6 + 0x53a35337
r3 = r1 * 5 + 0x9840294d
r2 = r2 ^ r3
r2 ^= r1 - 0x5eae4751
stack.pop(r0)
r0 += r2
stack.append(r0)
|
然后就可以写脚本得到flag了。👈官方的wp (ㄒoㄒ)
1
2
3
4
5
6
7
8
9
10
11
12
13
14
15
16
17
18
19
| v4 = [0]*7
v4[1] = 0xB0800699CB89CC89
v4[2] = 0x4764FD523FA00B19
v4[3] = 0x396A7E6DF099D700
v4[4] = 0xB115D56BCDEAF50A
v4[5] = 0x2521513C985791F4
v4[6] = 0xB03C06AF93AD0BE
for i in range(1, 7, 2):
enc_result = v4[i]
half_1 = v4[i+1] - (((enc_result << 6) + 0x53A35337) ^ (enc_result * 5 +
0x9840294D) ^ (enc_result - 0x5EAE4751))
half_1 &= 0xffffffffffffffff
print(half_1.to_bytes(8, 'little').decode(), end='')
half_2 = enc_result - ((((half_1 << 3) + 0x51E7647E) ^ ((half_1 * 3) +
0x0E0B4140A)) ^ (half_1 + 0xE6978F27))
half_2 &= 0xffffffffffffffff
print(half_2.to_bytes(8, 'little').decode(), end='')
print()
|
d3Hell
分析dll
其实,程序与dll的具体关系我还没搞懂,程序在哪里调用的dll我还不清楚,因此跟着wp提示走。
首先,看DllMain:
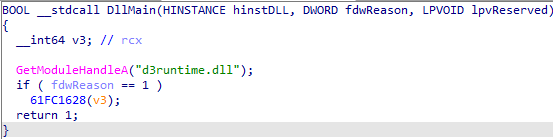
无论程序如何调用,64FC1628函数一定被调用了,因此查看64FC1628:
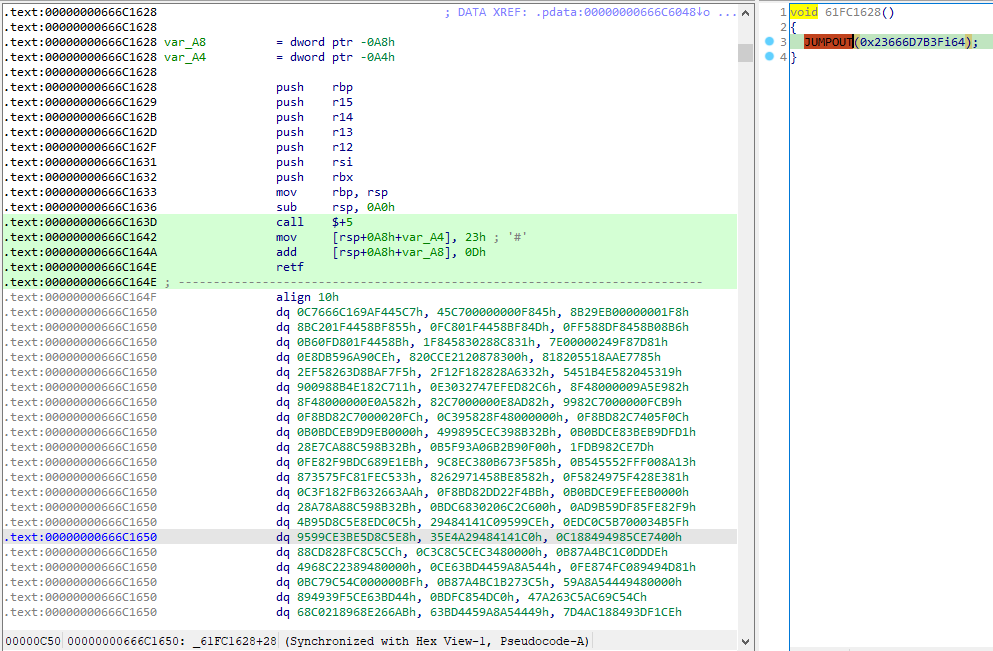
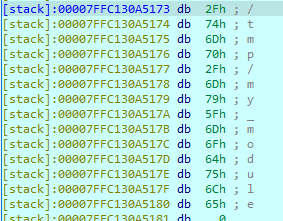
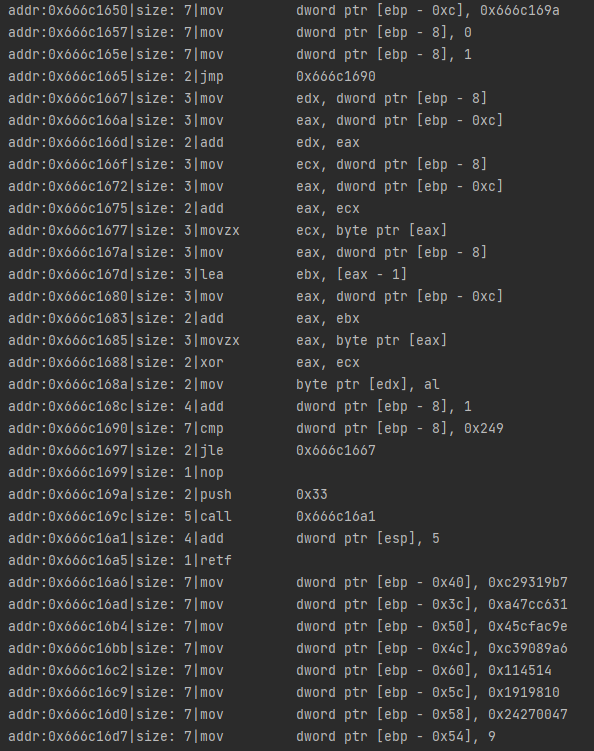
经wp提示,这里使用了天堂之门(可以从call $+5;,mov [ ], 23,retf观察出),即:
call $+5:跳到下一条指令,call指令大小为5,同时将0x666C1642地址入栈;
mov [rsp+0xA8-0xA4], 23h:将栈顶16位数据的前八位变成0x23
add [rsp+0xA8-0xA8], 0Dh:将栈顶16位数据 += 0x0D,使其retf返回地址指向0x666C164E
retf:远返回,该指令会从栈顶取出一个返回地址,再取出一个cs段选择子,这里的CS段变成了0x23,返回地址为0x666C164E,然后开始以32位模式开始0x666C164E处的指令
具体了解天堂之门,看这位✌ [天堂之门 (Heaven’s Gate) C语言实现
这段32位的指令具体多长目前还不确定,所以先都dump下来,让capstone翻译成32位指令。
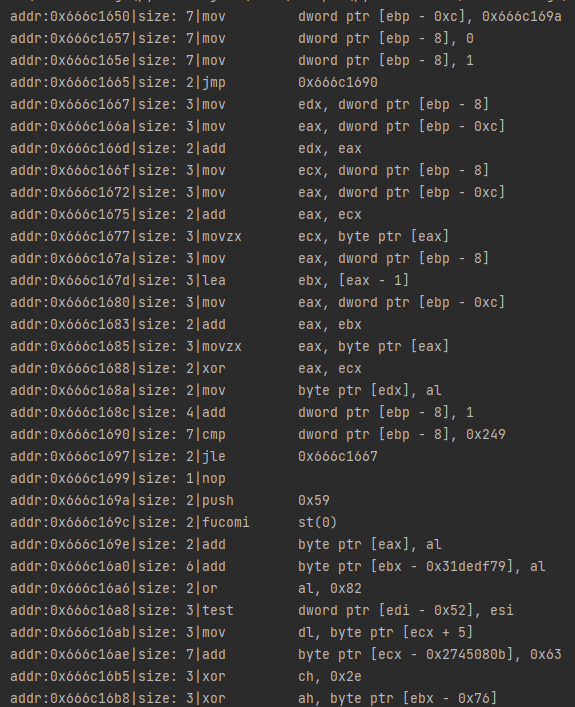
很明显,前一部分的代码是在异或0x666c169a - 0x666c18ea这部分,
因此,手动异或后再翻译:
0x666c169a - 0x666c16a5的代码是回到64位模式,因此将之后的部分用64位解释。
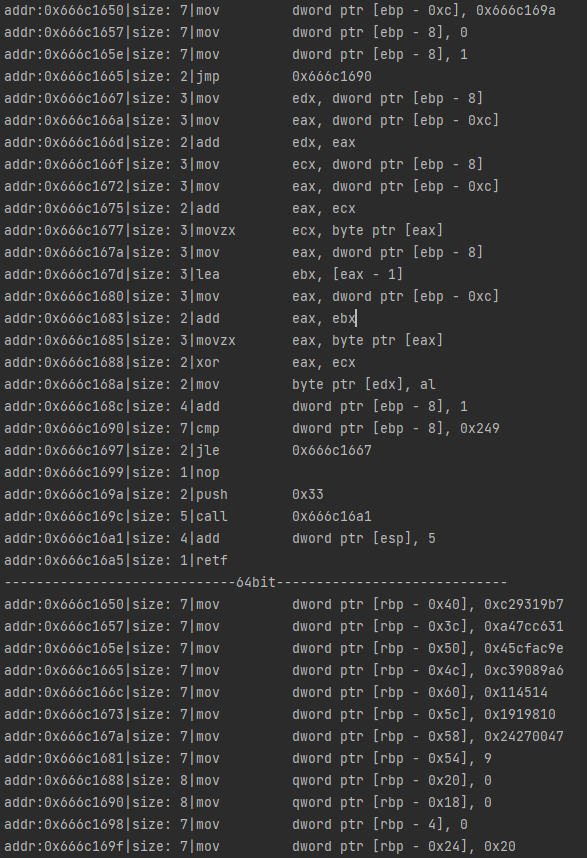
为了方便分析,将以上的处理在ida写脚本处理,然后nop掉异或数据以及模式转换部分的代码。
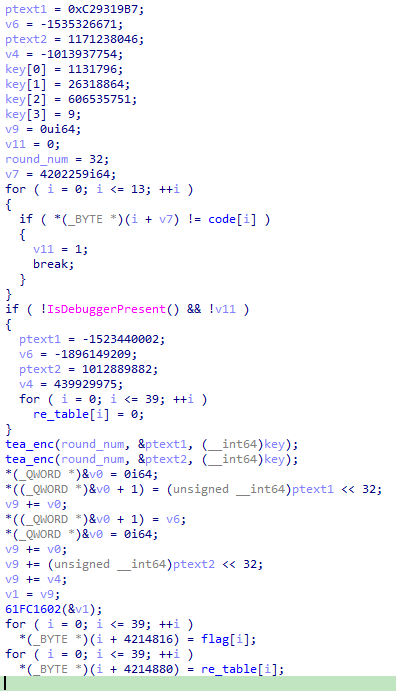
彻底得到函数逻辑了,但61FC1602()这个函数分析起来好麻烦(感觉是一个将数转化为十进制字符串的过程),所以动态获取flag结果:698740305822331500978964939673142241。

注意:
这个flag结果将放在exe的0x405020。
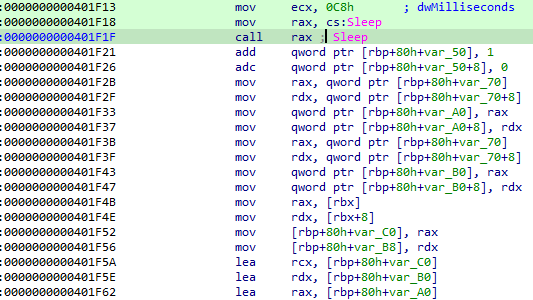
61FC1628()有检查4,202,264 = 0x401f18 地址部分的数据,因此如果要修改Sleep代码,则需要修改下dll。
分析exe
这个程序光是看着就头大,所以就从dll获取的flag调小,去看看每个函数的大概作用。
这里将flag调为 0x1ED = 17 * 29,然后一个个函数大概看看结果啥的。
因此,大概逻辑就是将flag分解为两个约数,然后都输出十进制数出来。👈这些是wp中说的,我还没分析出来呢
(具体分析看看有没时间吧 (ㄒoㄒ))
根据wp,可以跳过最耗费时间的401E64(应该是求约数的函数)然后将xmm0寄存器改为flag的两个约数之一。
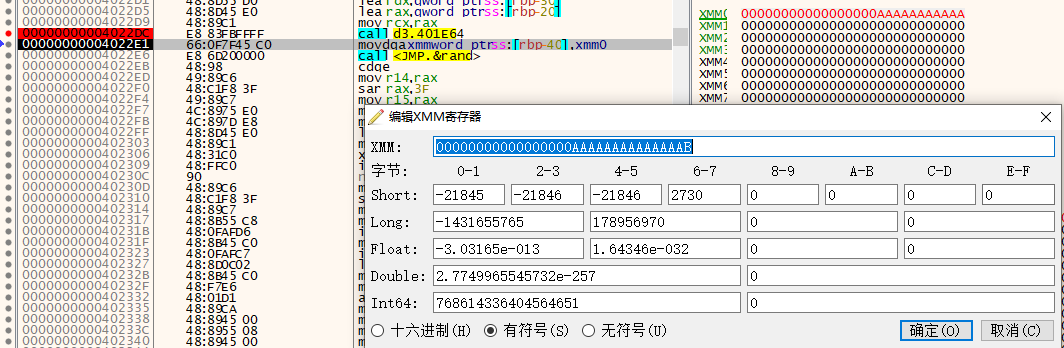
得到flag: